Quick Facts
- Bake Time: 15 minutes at 350°F
- Texture Secret: 1:1 blend of almond flour and gluten-free all-purpose flour
- Nutrition Profile: 131–254 kcal per doughnut with clean label ingredients
- Storage: Lasts up to 3 days in an airtight storage container
- Glaze Method: Natural plant-based doughnut glaze using superfood powders
- Pro Tip: Use the piping bag hack for a smooth finish in nonstick bakeware
To bake gluten-free doughnuts without a fryer, use a nonstick doughnut pan and a batter featuring a 1:1 blend of almond flour and a high-quality gluten-free all-purpose flour. This specific ratio, combined with hydrating ingredients like oat milk, creates a soft, cake-like crumb that avoids the dryness typical of gluten-free baking.
The Secret to Perfect Texture: The 1:1 Ratio
For many of us, the aroma of fresh doughnuts triggers a deep sense of nostalgia. However, traditional versions are often laden with refined sugars and inflammatory oils from the deep-frying process. In my work as a nutrition editor, I’ve found that the biggest challenge for home bakers is recreating that indulgent feel without the fryer. When it comes to baked gluten-free doughnuts, the primary hurdle is texture. All too often, gluten-free treats turn out crumbly, dry, or overly dense.
The breakthrough lies in a simple yet effective soft gluten free cake doughnut texture secrets: the 1:1 ratio. By blending a standard gluten-free all-purpose flour with almond flour, you introduce natural fats and protein that mimic the elasticity of gluten. Almond flour provides a rich moisture content that prevents the doughnut from drying out during the baking process. When selecting your base, I recommend using a high-quality blend like Bob's Red Mill flour or King Arthur, which are specifically formulated for consistency.
To ensure success, always use the spoon and level technique for flour measurement. Scooping directly from the bag packs the flour too tightly, leading to a heavy, brick-like doughnut. Instead, spoon the flour into your measuring cup and level it off with a knife. This scientific approach to measurement ensures your cake-like crumb remains light and airy. Furthermore, selecting a flour blend that is xanthan gum-free baking allows you more control over the structure, especially if you choose to add your own binding agents like psyllium husk or extra eggs for a sturdier rise.
The demand for these healthier alternatives is more than just a passing trend. Research indicates that the global adoption of gluten-free doughnuts is projected to increase by 36% between 2026 and 2027 as consumers shift toward health-focused and premium bakery variants. This shift is driven by a growing awareness of ingredient quality and dietary sensitivities. In fact, a survey of 2,000 consumers found that 60% perceive gluten-free products as healthier alternatives, contributing to a 50% increase in demand for indulgent gluten-free bakery items over a three-year period.
Step-by-Step: How to Bake Without a Fryer
Transitioning from a fryer to an oven requires a slight shift in technique, moving from a dough to a thick, spoonable batter. A gluten-free cake doughnut recipe relies on moisture and aeration rather than the structural strength of gluten.
Preparing the Batter
Start by whisking your dry ingredients, including the almond flour, gluten-free blend, baking powder, and a pinch of nutmeg—the secret ingredient for that classic bakery flavor. In a separate bowl, combine room temperature eggs, coconut oil, and oat milk. Using room temperature ingredients is vital; cold milk can solidify the coconut oil, leading to an uneven batter.
Mix the wet and dry components until a thick batter forms. To ensure your consistency is correct, perform the furrow test: draw a spoon through the batter; the "furrow" or path should hold its shape for a few seconds before slowly filling back in.
The Piping Bag Hack
One of the best gluten free doughnut pan baking tips is to avoid spooning the batter directly into the molds. This often creates air pockets and an uneven surface. Instead, use a large piping bag or a simple plastic bag with the corner snipped off. This allows you to pipe a continuous ring of batter into your nonstick bakeware.
- Grease your nonstick doughnut pan lightly with coconut oil, even if it claims to be nonstick.
- Pipe the batter into each mold, filling them about 3/4 of the way full. You want to leave about 1/4 inch shy of the rim to allow the doughnuts to rise without overflowing.
- Tap the pan firmly on the counter to release any trapped air bubbles.
- Bake at 350°F for approximately 15 minutes. The edges should be golden brown, and a toothpick inserted into the thickest part should come out clean.
These dairy free baked gluten free doughnut instructions prioritize clean label ingredients that support metabolic health while delivering a satisfying treat. Once out of the oven, let them rest in the pan for five minutes before transferring them to a wire rack. This prevents the delicate structure from collapsing while still warm.
Natural Aesthetics: The Blue Magic Glaze
The visual appeal of a doughnut is half the fun, but artificial dyes are often linked to behavioral issues and inflammation. In a health-conscious kitchen, we turn to the vibrant world of superfoods to create a stunning natural plant-based doughnut glaze.
To achieve a mesmerizing blue hue, we use butterfly pea flower powder or spirulina extract. These natural food coloring agents provide antioxidants alongside their brilliant pigments. For the base, I prefer using refined sugar alternatives like powdered maple sugar or monk fruit sweetener. This keeps the glycemic load lower while maintaining the classic icing texture.
Creating the Tie-Dye Effect
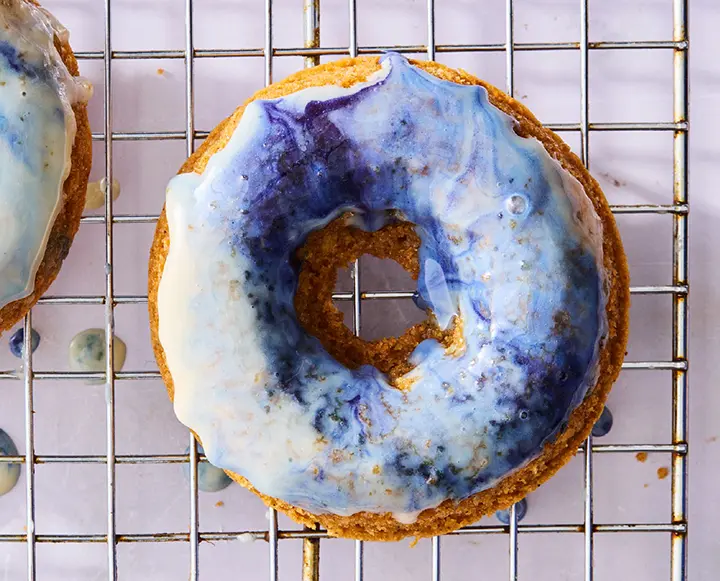
To create a tie-dye glaze effect, prepare a simple base icing of powdered maple sugar and a splash of oat milk. Divide the icing into two bowls. In one, whisk in a teaspoon of butterfly pea flower powder until it reaches a deep indigo.
Dip the top of a cooled doughnut into the white icing first. Then, take a toothpick dipped in the blue concentrate and swirl it through the white icing on the doughnut. This creates a marbled, ethereal look that is entirely plant-based and free from petroleum-based additives.
Troubleshooting: No Pan? Dry Doughnuts?
Not everyone has a specialized doughnut pan in their kitchen, but that shouldn't stop you from enjoying this recipe. You can easily adapt these instructions for a standard muffin tin. To create the hole, simply roll up a small piece of parchment paper or aluminum foil into a ball and place it in the center of each muffin cup before piping the batter around it.
If you find your doughnuts are consistently coming out dry, check your oven calibration. Gluten-free flours are sensitive to over-baking. Even two extra minutes can turn a moist treat into a dry one. Additionally, ensure you are incorporating enough hydrating ingredients. If your batter feels too stiff, add an extra tablespoon of oat milk.
Proper storage is also key for storing homemade baked gluten free doughnuts for freshness. Because they lack the preservatives of commercial brands, these doughnuts are best enjoyed within the first 24 hours. However, you can maintain their quality by placing them in an airtight storage container at room temperature for up to three days. To revive a day-old doughnut, a quick five-second zap in the microwave will soften the crumb and make it taste fresh-baked again.
FAQ
What is the best gluten-free flour for baked doughnuts?
The best choice is a high-quality all-purpose gluten-free blend that includes rice flour, potato starch, and sorghum flour. However, the real secret is mixing this 1:1 with almond flour. This combination provides the necessary structure from the starches and the essential moisture and fats from the almonds to create a perfect texture.
How do you prevent gluten-free doughnuts from becoming dry?
To prevent dryness, use hydrating ingredients like oat milk, coconut oil, and room-temperature eggs. Avoid over-measuring your flour by using the spoon and level method, and be careful not to over-bake. Once the doughnuts pass the toothpick test, remove them from the oven immediately to preserve their moisture.
Can I bake gluten-free doughnuts without a doughnut pan?
Yes, you can use a standard muffin tin. To create the signature doughnut shape, place a small ball of greased aluminum foil in the center of each muffin well and pipe the batter around it. This creates a central hole and allows the heat to circulate evenly, resulting in a similar bake to a traditional doughnut pan.
How long do homemade gluten-free doughnuts last?
Homemade gluten-free doughnuts are best when eaten fresh on the day they are made. If you have leftovers, they can be stored in an airtight storage container at room temperature for up to three days. For the best texture after the first day, briefly warm them in the microwave to restore their softness.
Can you freeze baked gluten-free doughnuts for later?
Absolutely. These doughnuts freeze remarkably well. For the best results, freeze them unglazed. Wrap each doughnut individually in parchment paper and place them in a freezer-safe bag for up to three months. When you are ready to eat, thaw them at room temperature and apply a fresh natural plant-based doughnut glaze.