Quick Facts
- Timeline: A full rotator cuff rehab protocol typically spans 20 weeks to ensure complete functional restoration.
- Success Rates: Research indicates that rotator cuff surgery maintains a high success rate, exceeding 95% for small tears and more than 70% for complex repairs.
- Non-Surgical Efficacy: For those pursuing conservative management, standard physical therapy programs show a 75% success rate in managing rotator cuff insufficiency.
- Recovery Milestones: By the three-month mark, patients generally achieve 75% pain relief and 50% functional recovery.
- Core Phases: Recovery is divided into three critical stages: protection (weeks 1-6), mobility (weeks 7-12), and progressive strengthening (weeks 13-20).
- Primary Objective: The goal is to restore the glenohumeral joint function through a mix of passive motion, isometric contractions, and eventual resistance training.
Rotator cuff rehab typically progresses through three distinct phases: protection, mobility, and strengthening. During the initial six weeks, the focus is on protecting the repair and allowing tissue healing. From weeks 7 to 12, the priority shifts to restoring passive and active range of motion. Finally, weeks 13 through 20 emphasize progressive resistance training to rebuild shoulder strength and functional stability.
Assessing the Damage: Signs of a Rotator Cuff Tear
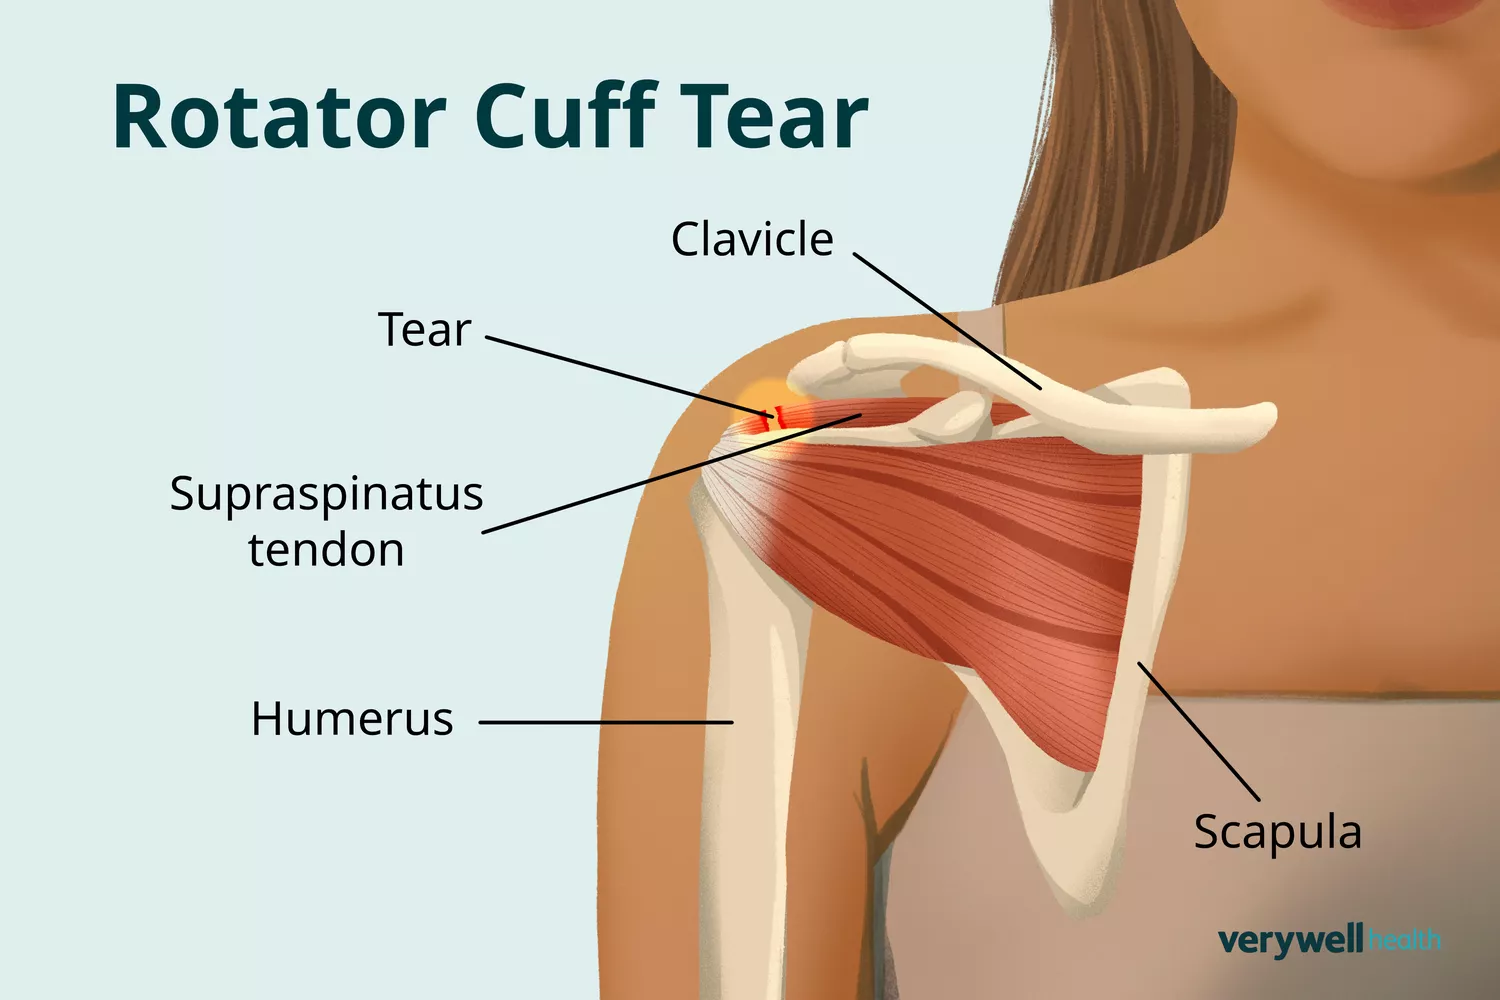
Before you dive into any rotator cuff rehab program, you need to understand what you are working with. The rotator cuff is a group of four tendons and muscles: the supraspinatus tendon, infraspinatus, teres minor, and subscapularis. These work in unison to keep the head of your upper arm bone firmly within the shallow shoulder socket. When one of these tissues is compromised, the entire mechanics of the glenohumeral joint are thrown out of alignment.
Identifying the specific nature of your injury is the first step toward a faster recovery. Many athletes confuse simple shoulder impingement with a genuine tear. However, certain clinical signs are hard to ignore. If you find yourself struggling with night pain—specifically pain that wakes you up when you roll onto your side—or if you experience a distinct "dropping" sensation when trying to lower your arm slowly, you are likely dealing with a tear.
Look for these specific symptoms during your daily activities:
- Dull ache deep inside the shoulder that radiates toward the bicep.
- Audible clicking or popping sounds during overhead reaching.
- Notable weakness when attempting to lift objects or rotate the arm outward.
- Difficulty reaching behind your back or combing your hair.
These are common signs of progress during rotator cuff rehabilitation when they begin to fade, but at the onset, they signal that your supraspinatus tendon may be under significant stress. Whether the cause is acute trauma from a heavy lift or degenerative wear from years of overhead sports, your approach to recovery must be systematic.
Phase 1: The Protection Period (Weeks 1–6)
The first six weeks are the most critical for long-term success, yet they are the most frustrating for high-performers. In this stage, the primary goal of your rotator cuff rehab is to facilitate tissue healing without placing any tension on the repair or the injured tendon. Whether you are following a non surgical rotator cuff rehab protocol or recovering from an operation, your "active" work is minimal.
During this window, we focus heavily on passive range of motion. This means the arm is moved by an external force—either your other arm or a physical therapist—while your shoulder muscles stay completely relaxed. This prevents the joint capsule from tightening up while ensuring the healing site is not pulled apart.
To maximize this phase, you should also integrate isometric contractions. These are "static" holds where the muscle tightens but the joint does not move. For example, gently pressing the back of your hand against a wall to engage the external rotators without moving the arm. This helps prevent significant muscle atrophy without endangering the structural integrity of the cuff.
Sleep is often the biggest challenge in Phase 1. Finding the best sleeping positions during rotator cuff recovery is essential for both comfort and blood flow. I recommend sleeping on your back with a small pillow tucked under the elbow of the injured arm. This "props" the shoulder up and prevents it from dropping backward, which can strain the anterior capsule. Avoid sleeping on the affected side at all costs, as this compresses the glenohumeral joint and can delay healing.
Consistent use of rotator cuff rehab exercises at home, such as pendulum swings, helps maintain some level of mobility. You simply lean over a table, let the injured arm hang vertically, and use your body's momentum to swing the arm in small circles. It is low-effort but high-reward for maintaining joint lubrication.
Phase 2: Restoring Mobility and Control (Weeks 7–12)
Once you reach the seven-week mark, the biological "glue" holding your tendon together is significantly stronger. Now, the rotator cuff recovery phases transition from protection to active movement. The priority here is restoring the rhythm between your shoulder blade and your humerus.
We start by introducing scapular stabilization. Many people think shoulder rehab is all about the "cuff," but your shoulder blade (scapula) is the foundation. If your scapula doesn't move correctly, you will experience shoulder impingement every time you lift your arm. Focus on "setting" your shoulder blades down and back before performing any movement.
During weeks 7 through 12, we utilize various shoulder rehabilitation techniques to regain active range of motion. One of the most effective tools is the "wall slide." Stand facing a wall, place your forearms against it, and slowly slide them upward. This encourages the muscles to fire in a controlled, gravity-assisted environment.
A key expert cue I give my athletes is the "60-degree rule." Avoid "winging" your arms out to the side beyond 60 degrees during early active movement. Staying within this safe zone prevents the humerus from pinching the supraspinatus tendon against the acromion bone.
Signs of progress during rotator cuff rehabilitation in this phase include being able to reach for a glass in a cupboard without a sharp "catch" in the shoulder. You should also see an improvement in your neuromuscular control, meaning your movements feel smoother and less jerky. We often introduce external rotation using very light resistance or just the weight of the arm to begin re-awakening the posterior cuff muscles.
Phase 3: Advanced Strengthening and Return to Function (Weeks 13–20)
This is where the real work begins. By week 13, the tendon has matured enough to handle progressive resistance training. Your goal is no longer just "moving" the arm; it is about building a shoulder that can handle the demands of your sport or daily life.
We move away from passive stretching and toward functional shoulder strengthening exercises. The use of resistance bands is the gold standard here. Bands provide linear variable resistance, meaning the exercise gets harder as you reach the end of the range of motion—exactly where the shoulder is often most vulnerable.
To truly remodel the tendon and build resilience, we emphasize eccentric loading. This involves focusing on the "lowering" phase of an exercise. For example, when doing an external rotation with a band, pull the band out quickly but take a full three to five seconds to let it return to the starting position. This slow, controlled lengthening under tension is what builds tendon thickness and strength.
Restoring joint proprioception is another vital component of Phase 3. Your brain needs to relearn exactly where your shoulder is in space. We use "plank taps" or ball tosses against a wall to challenge the joint's stability in dynamic environments.
For athletes, the final hurdle is returning to overhead sports after rotator cuff injury. You should not attempt a full tennis serve or a heavy overhead press until you have reached specific milestones, such as having at least 90% of the strength of your uninjured side and zero pain during high-speed movements.
Common Pitfalls and Expert Recovery Hacks
Even the best rotator cuff rehab plan can be derailed by small mistakes. One of the most common errors is the failure to isolate the target muscles. When performing external rotation, many people use their larger lat or deltoid muscles to compensate.
A pro tip to fix this is the "towel roll" technique. Place a rolled-up towel between your elbow and your ribs while performing rotations. Squeeze the towel gently. This simple trick prevents your arm from flaring out and forces the infraspinatus and teres minor to do the heavy lifting.
Another pitfall is overtraining. While it is tempting to push through the pain to get back to the gym faster, tendons have a limited blood supply compared to muscles. They need more time to recover between sessions. If you feel a "throbbing" ache that lasts more than two hours after your rotator cuff rehab exercises at home, you have pushed too hard. Scale back the intensity and focus on quality of movement over quantity.
Finally, do not let the "fear of movement" slow you down. While protection is vital in the early weeks, staying too guarded for too long can lead to a frozen shoulder. Trust the timeline. By following a structured rotator cuff recovery timeline milestones, you give your body the permission it needs to heal and the stimulus it needs to grow strong again.
FAQ
How long does it take to rehab a rotator cuff injury?
A comprehensive rehab program typically takes about 20 weeks. While you may feel significantly better by the 12-week mark, the final two months are essential for building the high-level strength required to prevent a re-injury, especially if you plan on returning to heavy lifting or overhead sports.
Can a rotator cuff tear heal without surgery?
Yes, many tears can be managed effectively without surgery. Clinical studies show a 75% success rate for non-surgical physical therapy programs. Conservative management focuses on strengthening the surrounding muscles to compensate for the damaged tendon and improving the overall mechanics of the glenohumeral joint.
What are the best exercises for rotator cuff rehabilitation?
The best exercises evolve with your stage of recovery. Early on, pendulum swings and passive stretches are best. As you progress, scapular squeezes, wall slides, and external rotations with resistance bands become the most effective tools for restoring strength and stability.
What are the stages of rotator cuff physical therapy?
The process is generally broken into three stages. Phase 1 is the protection phase (weeks 1-6), focusing on healing and passive motion. Phase 2 is the mobility phase (weeks 7-12), focusing on active movement and scapular control. Phase 3 is the strengthening phase (weeks 13-20), focusing on resistance training and functional return.
What activities should I avoid during rotator cuff recovery?
During the early phases, you must avoid any heavy lifting, sudden reaching movements, or "pushing" activities like push-ups. Most importantly, avoid overhead lifting or reaching behind your back until your therapist confirms your shoulder blade stability is sufficient to handle those loads without impingement.
How do I know if my rotator cuff is healing?
Consistent signs of progress include a reduction in night pain, increased ease with daily tasks like dressing or grooming, and a gradual increase in the range of motion you can achieve without a "catching" sensation. Improved strength during resisted external rotation is also a key clinical indicator of healing.